
This is the Hairdini UNREAL ENGINE SHADER SETUP GUIDE.
For the Hairdini Houdini HDA Documentation, please click HERE.
For the Hairdini Substance Designer Material Documentation, please click HERE.
Download the sample UE4 material:
https://drive.google.com/file/d/1XKbHjGcJDtdXTYES_l2_iYqQLkGlwk9A/view?usp=sharing
Note, it doesn’t include the Substance Maps, so you’ll have to re-plug them in when you import your Substance Hair material.
Here is a quick setup guide using Unreal Engine’s templates for a Pivot Painter Material with the Hairdini Hair Cards and Substance Material. Please email with any questions or recommendations. This is assuming you want Pivot Painter in your hair to simulate a bit of wind.
Once you’ve made a Hairdini Hair Card Wig and have a Hairdini Substance Material setup you like, import both into an Unreal Engine Project.
For the Hairdini Hair Card Wig and Character, DO NOT CHECK “Convert Scene Units”, as that will mess up Pivot Painter.
For the Substance Material, import the graph file. You’ll need the Substance Designer plug in, so make sure to install it. Double click the material instance, which is the RED SUBSTANCE DESIGNER icon, in the Unreal Engine content browser. A menu will come up with the material settings. Check “Height”, “Comb Map”, and “Roots, Scatter, and Tips” toggles, as Unreal turns them off by default. Those textures will now appear in your content browser.
Double Click the Hairdini Substance Icon after importing the graph via the Substance Plug In. It’s colored red with the Substance logo.

Be sure to toggle ON the Height, Comb, and the Roots Scatter Tips maps. They’re off by default.

Download the Unreal Engine Content Examples project on Epic’s Marketplace. It’s free. There’s a Pivot Painter Shader we’ll need called DirectionalAni_Offset.
Now we need to get the DirectionalAni_Offset Pivot Painter shader from the Unreal Engine Content Examples. Download the Unreal Engine Content Examples package from the Unreal Engine marketplace. It’s free. Find the Directional Ani Offset Shader and import or migrate the shader into your character’s project. This material is made for Pivot Painter to mimic grass. Grass, like hair, has roots that anchor it to the ground and wiggle with the wind at the tip. So that’s the best template to use.
The DirectionalAni_Offset shader is located in the Content>ExampleContent>ScriptExamples>PivotPainter>Materials folder in the Unreal Engine Content Examples project. Or just do a search for “DirectionalAni_Offset”. Right click the material to export or migrate it over to your project.
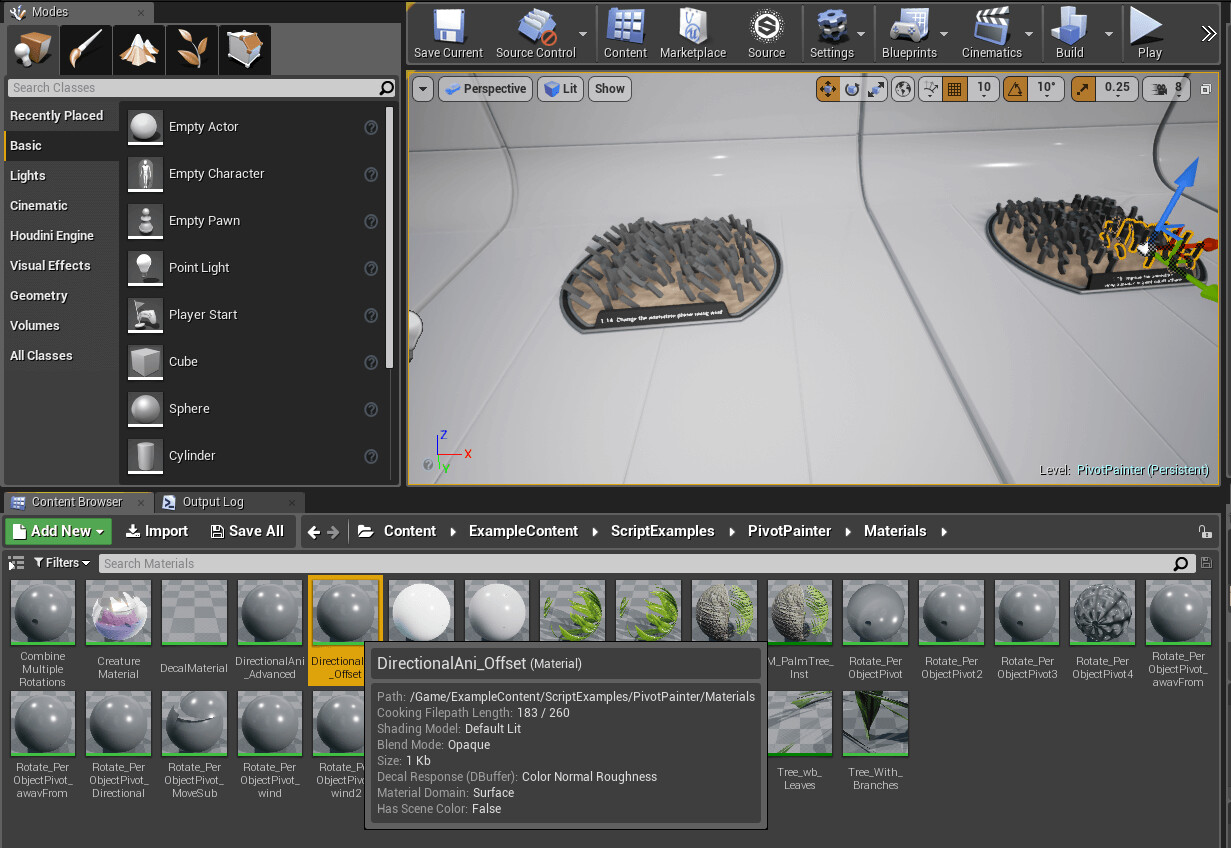
Grab the “DirectionalAni_Offset” shader to build a Pivot Painter Hair Material.
PIVOT PAINTER HAIR SHADER from DIRECTIONALANI_OFFSET
We’ll now need to make a few modifications to turn the DirectionalAni_Offset shader into a hair shader. Double click on the master material output node pictured below. Change the “Shading Model” to “Hair”. Then CHECK TANGENT SPACE NORMAL (Pictured below on the bottom left). You’ll see the Normal input change into Tangent, as pictured below.
Unplug the existing inputs that by default are plugged into uv4 and uv5, as that’s a procedurally made Normal that Unreal includes in the DirectionalAni_Offset shader. We won’t need them since we’ll be using tangents as normals instead. Plus those inputs will interfere with our Flow Map data from Houdini, which uses uv4 and uv5, so we can’t have anything overriding those values.
Next we’ll cover inputs, don’t plug in all your Substance Designer textures just yet. Some have special instructions.
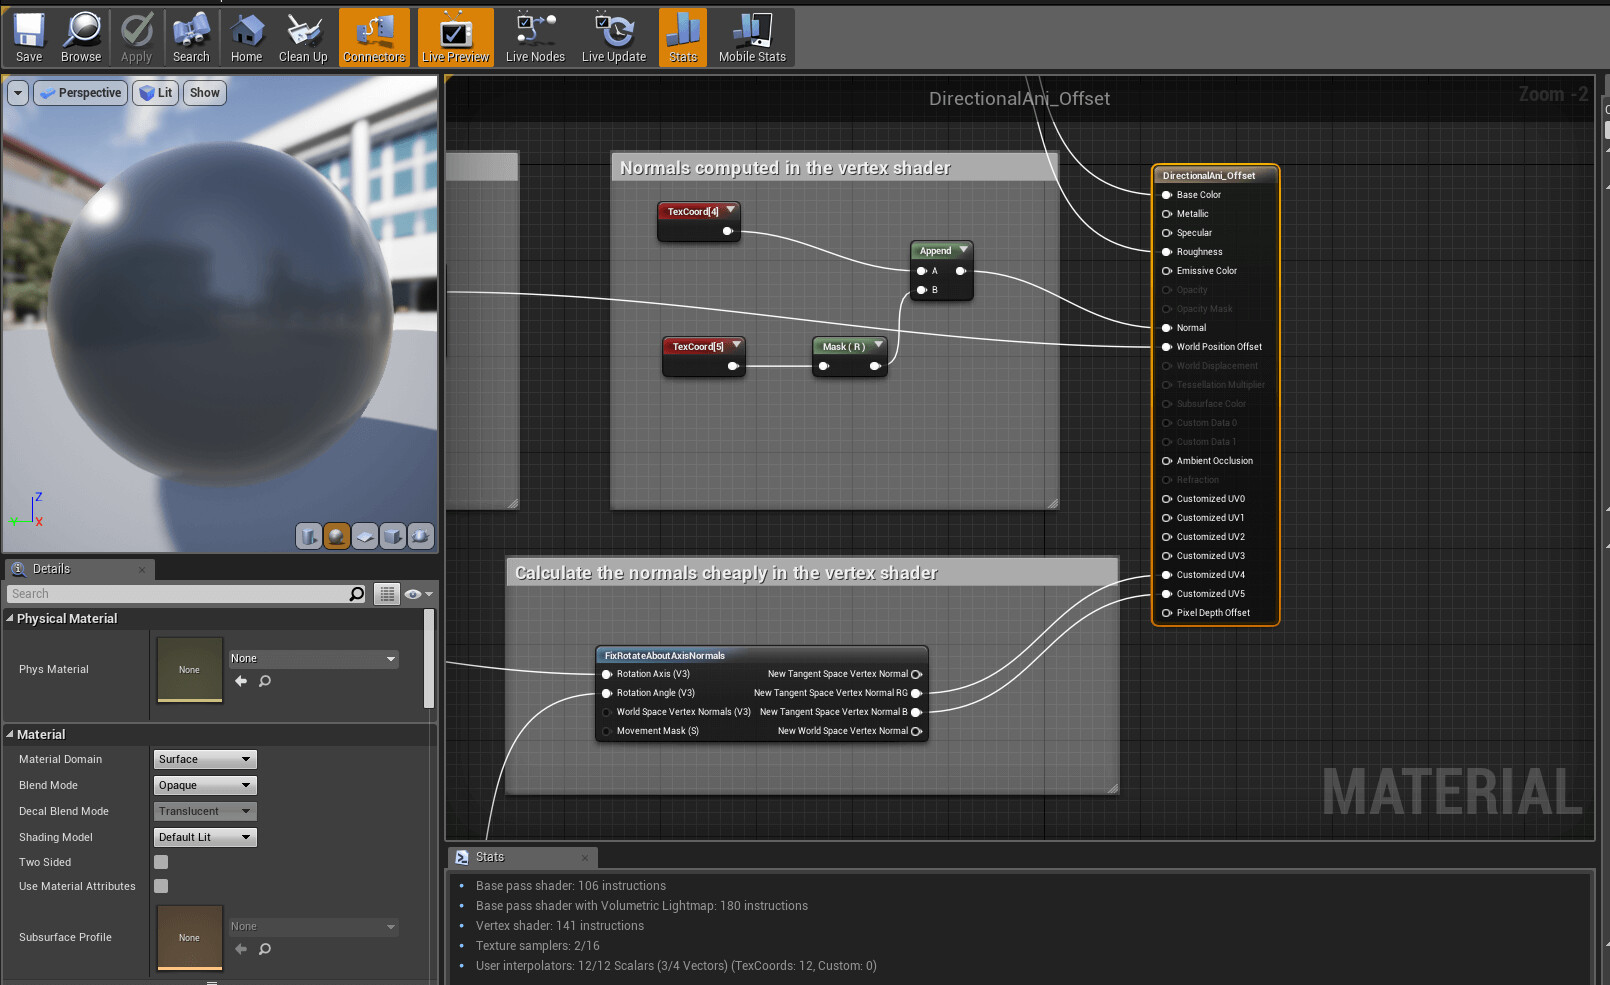
Unplug “Normals computed in the vertex shader” and the UV4 and UV5 inputs, in the “Calculate the normals cheaply in the vertex shader” comment box. We’ll be using Tangents not Normals and the UV4 and UV5 inputs will need to be blank so they don’t overwrite our Houdini Comb Map.
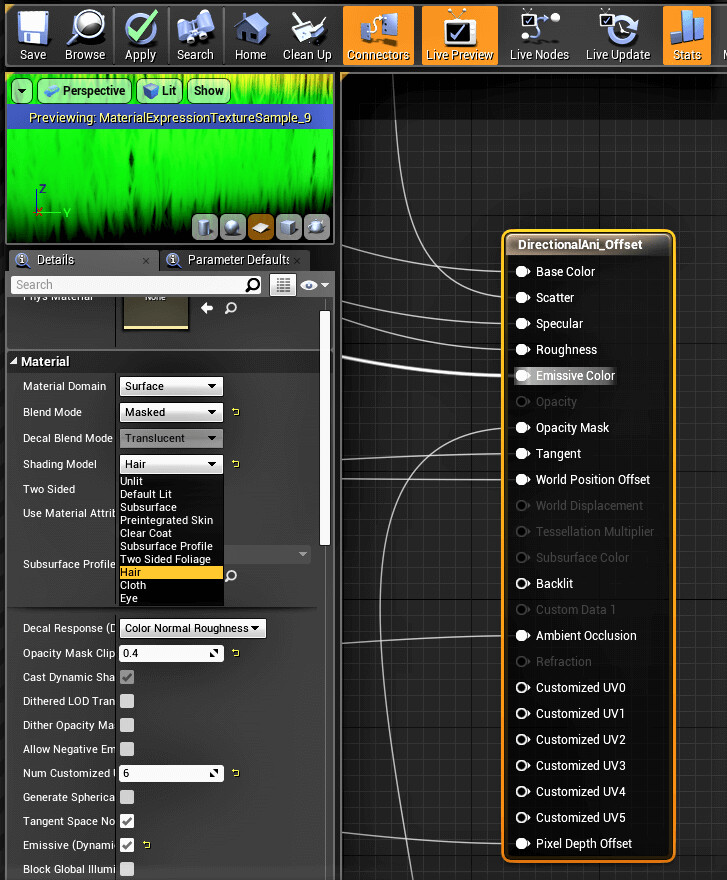
Set the Shading Model to “Hair” and turn ON Tangent Space Normals.
BASIC INPUTS
For simplicity’s sake, go right head and PLUG IN the following textures from Substance Designer into the following inputs from the Unreal Engine Shader:
BASE COLOR: Diffuse from Substance Designer goes straight into the Base Color Input.
SCATTER INPUT: Grab the Roots, Scatter, and Tips texture from Substance Designer. Plug the green channel into the Scatter input. Remember only the green channel has the scatter mask. The R and B channels contain the Roots (R) and Tips (B). We only need the green channel going into the scatter input.

Roots, Scatter, and Tips output from the Hairdini Substance material. Plug the scatter map in the green channelinto the scatter input of the Unreal Engine hair shader. The POWER node in between is optional. It will allow you to control falloff and contrast. Lower values under 1.0 to have a low contrast, gradual falloff. High values will increase the contrast.
SPECULAR: Specular from Substance Designer goes straight into…drum roll…suspense…wait for it…the Specular input.
ROUGHNESS: The Gloss Map from Substance will need to be converted into a Roughness Map. Input the Gloss Map into a 1-x node, which inverts the map, making it a Roughness map. Then plug that 1-x node into Roughness.
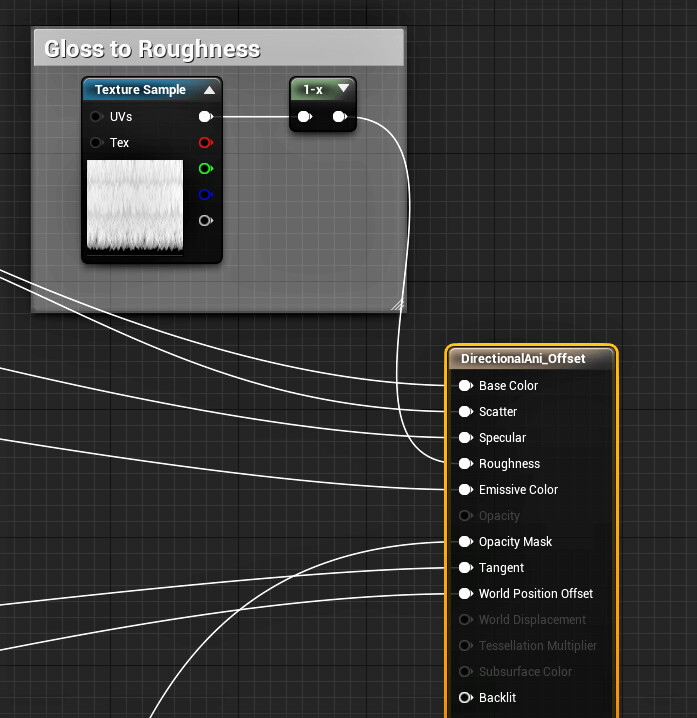
Turn the Gloss Map into a Roughness Map by using a 1-x node.
EMISSIVE: For the Emissive input, you can simply plug your Diffuse map into a MULTIPLY node. You will multiply the mask by a value of your choosing to DARKEN IT. Just keep the value WELL UNDER ONE so it doesn’t clip and go above 1, which will brighten everything. Try .2 (20 percent) to start off with, and adjust to your tastes. Emissive is powerful and can do a lot with a dark image so don’t overdo it.
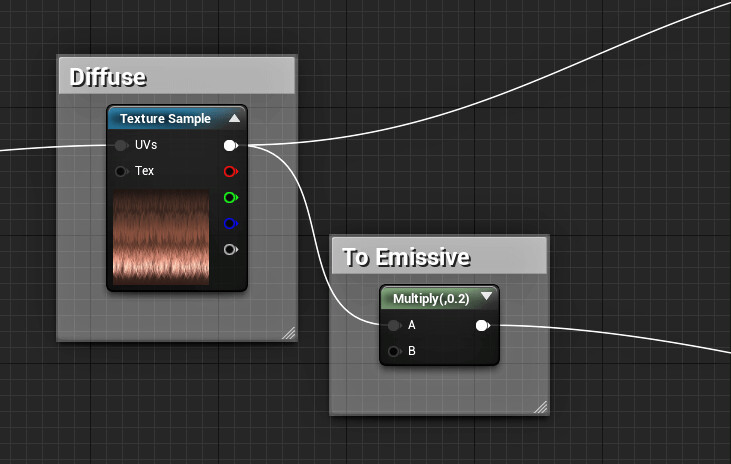
Make a quick Emissive Map by multiplying the Diffuse Map by a fraction.
AMBIENT OCCLUSION: Ambient Occlusion goes straight into Ambient Occlusion.
Leave the World Position Offset alone, for now. It’s fine as is, although we’ll discuss an adjustment you can make a little later on.
The Backlit input in the Material Output node DOES NOTHING. It’s deprecated and actually doesn’t have anything hooked up inside. It’s like the appendix. Don’t worry about it.
Now we’ll cover what to do with the Tangent, Opacity, and Pixel Depth Offset inputs.
TANGENT INPUT
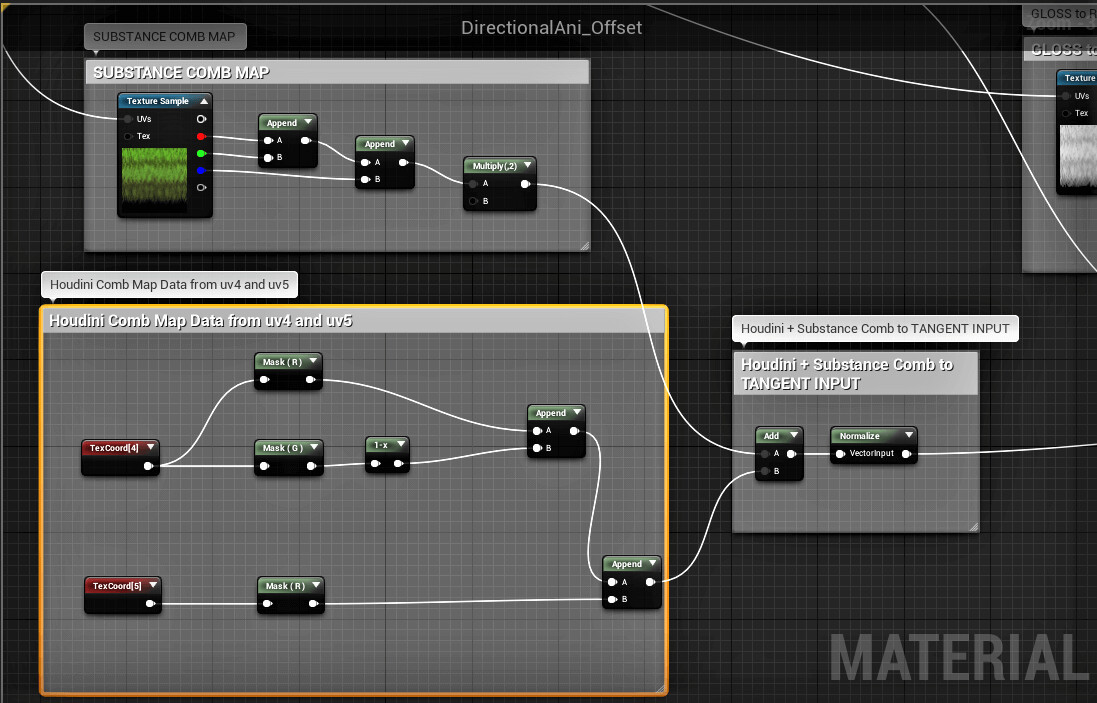
You can simply make the graph from the picture below. Pretty much grab the Comb Map Texture from Substance Designer and add it to the Comb Map data from Houdini, then NORMALIZE it, so it doesn’t go above 1. The append nodes are because the Comb Map from Substance is a Vector 4 vs. a Vector 2 from the Texture Coordinate nodes reading a Vector 3 from Houdini. Confusing? Yes I know. That’s why we split up the Comb Map data from Houdini into both uv4 and uv5, as Unreal can only read the first two values of the vector 3 uv.
Texture Coordinate nodes in Unreal are vector 2s, and ignore the Z channel, so we need to make a vector 3 out of them. Remember we stored the Z data from our Houdini Comb Map in uv5’s X value. Sorry for the tongue twister, as not everyone may be swizzle savvy. Grab the R and G values from Texture Coordinate 4 (which is uv4 from Houdini). Grab two mask nodes and set one to R and the other to G as pictured. For some reason, Unreal was reading the Y data inverted, so I had to input a 1-x node after it, as pictured. I have no clue why or if it’s a bug in Unreal. In theory we shouldn’t need a 1-x node, but alas, I have to mention it in case someone else has the same issue. Plug the R and G values into an append node, then AFTER that append node, add another append node to get the Texture Coordinate 5’s (uv5 from Houdini) X Value…masking the R channel…which includes the Z data from Houdini. Again, Unreal Engine’s Texture Coordinate nodes IGNORE Z channels stored in Houdini uv attributes, so we had to store it in the X value of uv5. We now have a full vector 3 to add to our Substance Comb map.
Apologies if this was confusing, but that’s why there’s pictures. Just mimic the graph below and plug all of that into the Tangent input of the Master Material Output node. The Multiply node in the Substance Comb map is OPTIONAL. It will allow you to control the STRENGTH of the Comb Map vs. the Houdini Comb Map. Increase the value in the multiply node to make the Substance Comb Map stronger. Or lower the value to make it weaker.
The difference between the two comb maps is this: The Substance Comb Map emphasizes the individual hairs but has no data on the actual hair card geometry. So the INDIVIDUAL hairs will have a specular highlight based on their FLOW and virtual height and curves, but will NOT have specular highlights on the actual curves of the hair style, since it has no clue what geometry it will be applied to. This is why we need the Houdini Comb Map IN ADDITION to the Substance Comb Map. The Houdini Comb map adds the curves and directions of the hair cards to get a proper specular highlight and scatter based on the hair card shapes, but of course, would not have information on individual hairs…so the Substance and Houdini Comb maps are the perfect tandem.
Example Blue Print in Unreal Engine getting the Comb Map data from Houdini on the bottom and from the Hairdini Substance, on the top. Add the two together, then normalize , to mix them together.
Here’s some sample pics to illustrate the concept of the two different comb maps working together. The first picture just has the Houdini Comb Map WITHOUT the Substance Comb Map. The second picture has them mixed together.
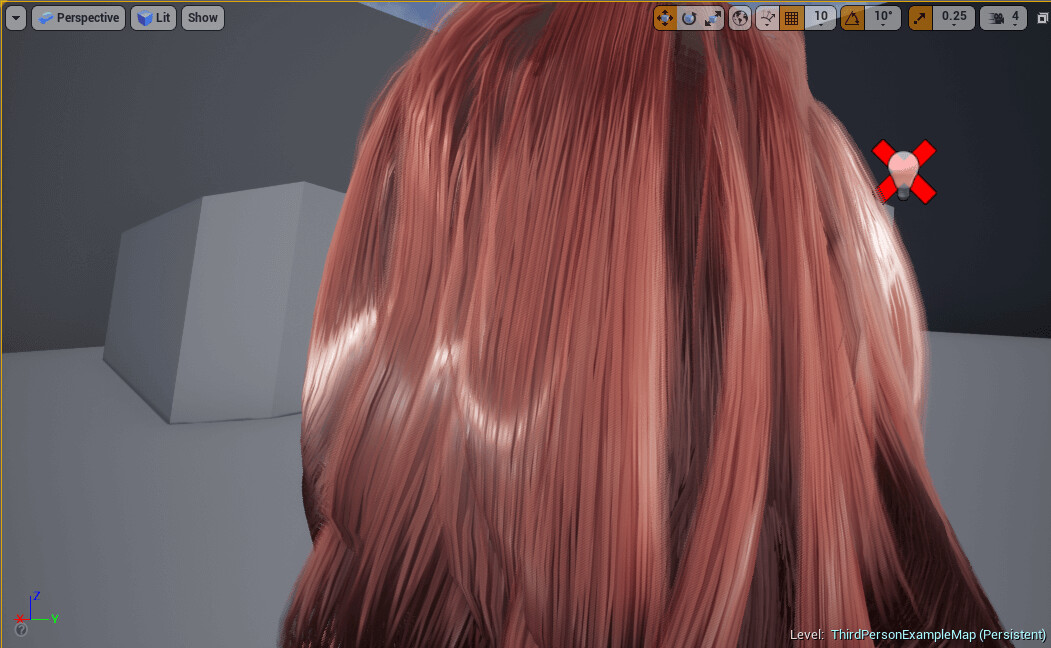
The Comb Map from Houdini is on to align specular highlights to the hair card geometry properly. The Substance Comb Map is NOT active. Notice it looks like a straight line over a flat card with the opacity cutout. Looks good, but not quite there yet.
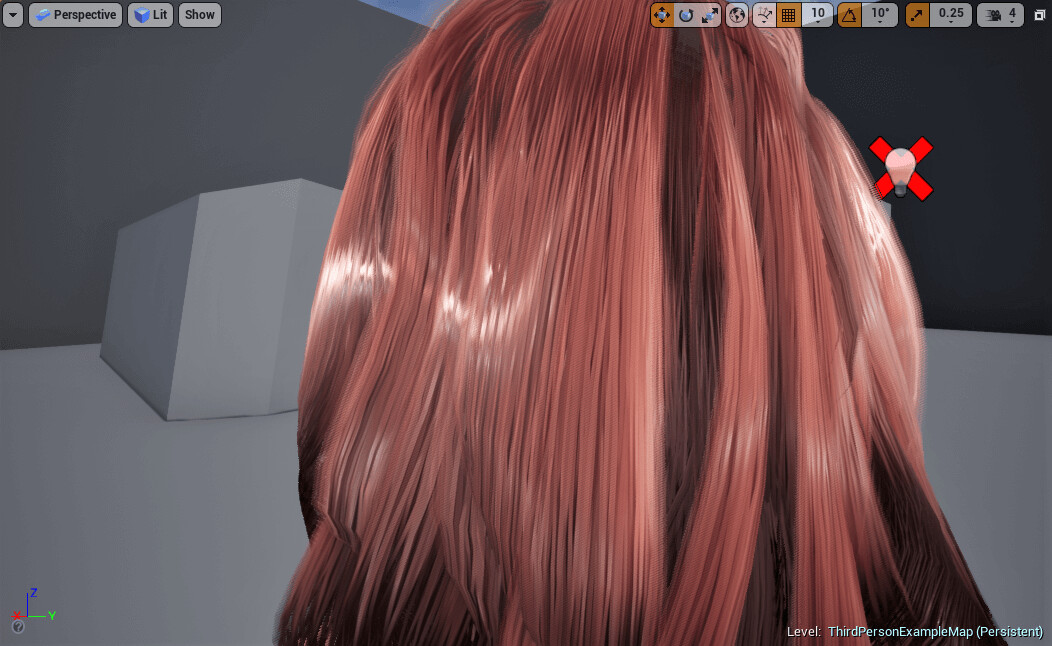
Now we turn on the Substance Comb Map and mix it with Houdini’s comb map. Notice the specular highlights are now ALIGNING with INDIVIDUAL STRANDS of hair and are offset a bit, not in a straight line. This helps add depth to the hair and sell the illusion of many hairs and not flat polygons.
OPACITY and PIXEL DEPTH OFFSET INPUTS
The Opacity and Pixel Depth inputs will do two special things that help make the hair cards look more natural.
The Opacity mask from Substance Designer will be plugged into an edge mask node structure to mask the edges depending on the viewing angle, fading out hair cards as the edge of the card turns into view, to avoid the polygon look. It will look like full value and like it normally would looking head on, but gradually fade from the side view. This will create some balding, so be sure to have hair or a hair color PAINTED on your character’s scalp to cover it up. This is standard procedure for hair.
The Height Map from Substance Designer will be plugged into a node structure to feed the depth information of each hair into the opacity node structure from above, which will fade individual hairs (yes individual hairs, not by the whole card) based on their depth value. This FADES any CARD INTERSECTIONS with the scalp as well as with other hair cards. A VERY COOL feature.
Copy the graph from below into your shader. Right click the image and select “Open Image in New Tab” to get a bigger view if you have problems reading.
The Multiply Node in the Pixel Depth Offset comment box goes into the PIXEL DEPTH OFFSET input. The Strength node in the same Pixel Depth Offset comment box is merely a float value. Usually set it to 2 and it converts the height map from 0-1 to -1 to 1 space. EdgeMaskContrast and EdgeMaskMin are merely float constants that are promoted to parameters.
Here are some BEFORE AND AFTER PICS with Pixel Depth Offset. It’s OFF on the first pic, ON in the second pic.
Before Pixel Depth Offset is applied. Notice the FLAT LOOK and harsher hair card intersections, especially on the bottom right.

After Pixel Depth Offset is applied. The hair intersections now blend into one another.
WORLD POSITION OFFSET
This is an optional modification you can do. It pretty much forces the movement to be concentrated at the tips. It leaves the roots and hair that hugs the scalp alone, to stand still, as they normally would.
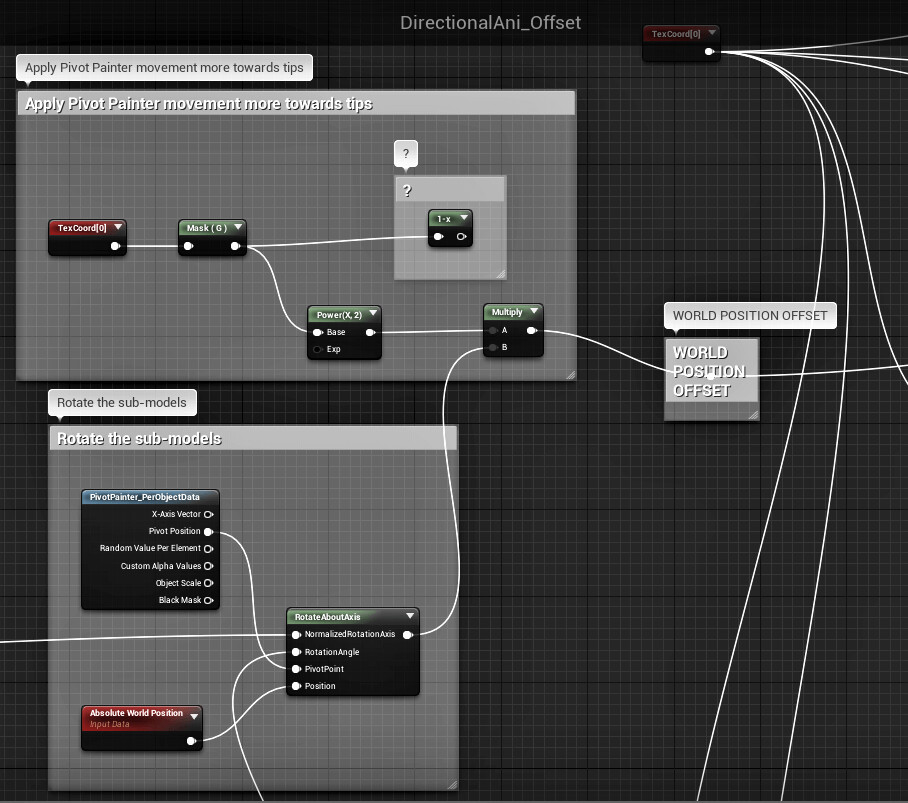
You can copy the graph above. Pull out from the “Rotate About Axis” node and plug in the “Apply Pivot Painter movement more towards tips” comment box nodes to that multiply node. It’s taking the rotation values and multiplying them by the UVy values to decrease the movement as you move up towards the root.
Remember the Roots start at UVy value 1.0 and the Tips are at UVy 0. In theory you should need a 1-x node (pictured) so the Roots would then have a 0 value and the Tips would have a 1 value, so 0 times the movement = no movement at the roots and 1 times the movement value at the tips would be full movement. However, for whatever reason, Unreal is flipping the UVy values, so I left the 1-x node out…which baffles me and someone please let me know if they encounter the same behavior with Unreal.
You have to mask out the green channel containing UVy from Texture Coordinate 0, which holds the UVs. Put it into a Power node to increase or decrease the contrast, with higher values being more contrasty and only effecting the extreme tips. Multiply that by the “Rotate About Axis” and send it to World Position Offset. By default, World Position Offset will have the “Rotate About Axis” as its input.
ADJUST THE STOCK SETTINGS
You can adjust the speed and magnitude of the movement by adjusting these two constant parameters highlighted below, in the “Add the DOT product result to the previous animation to offset it” comment box.
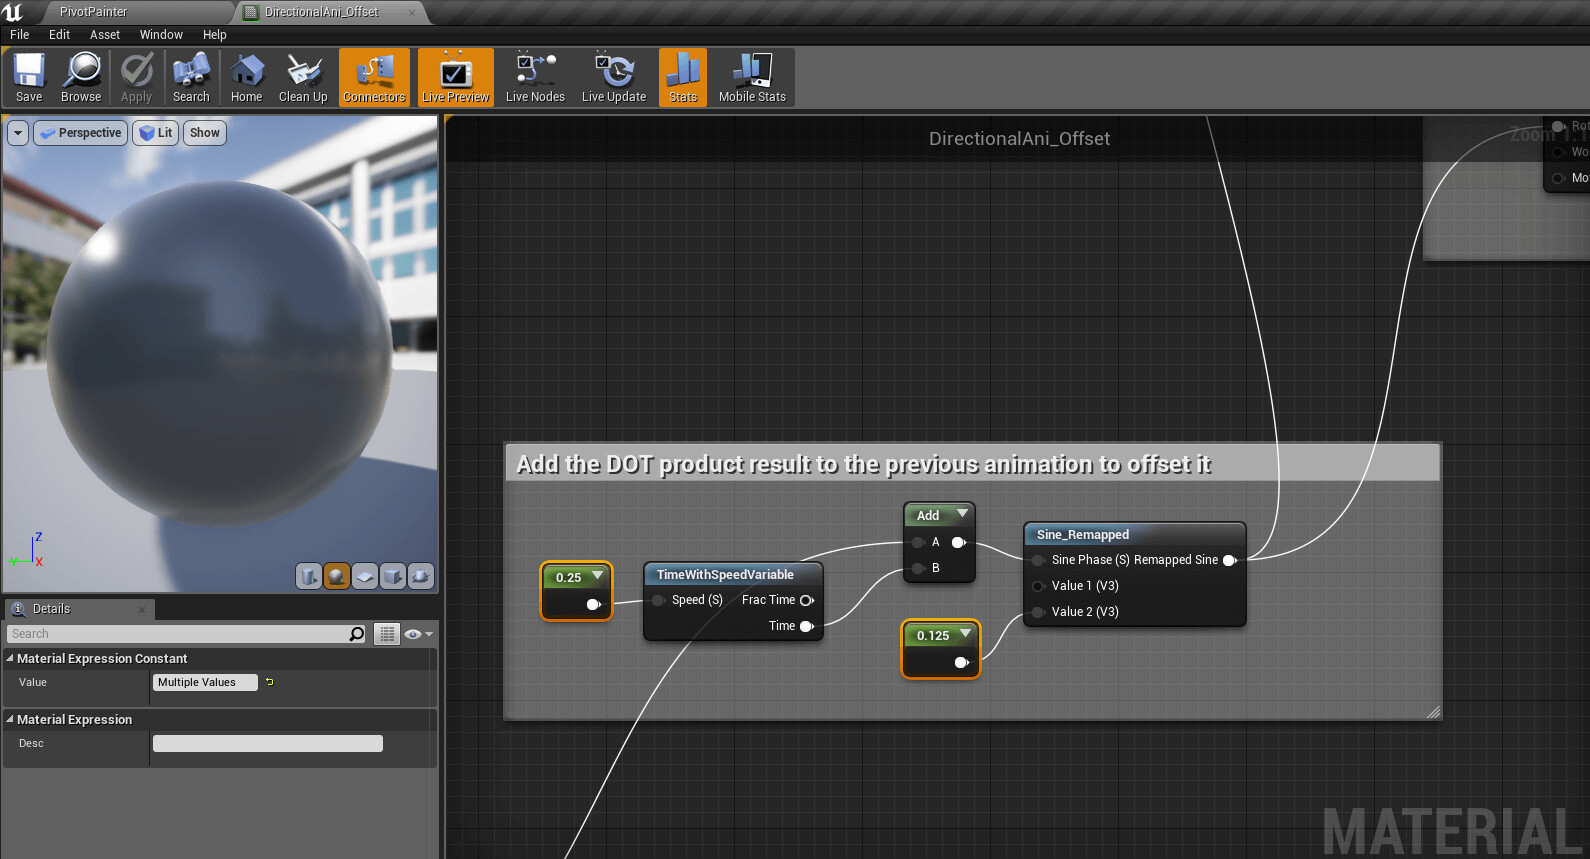
Adjust the highlighted parameters to slow down or speed up movement and the magnitude.
PLEASE BE SURE TO CHECK OUT THE REST OF THE DOCUMENTATION:
The Hairdini Houdini HDA Documentation
The Hairdini Substance Designer Documentation